
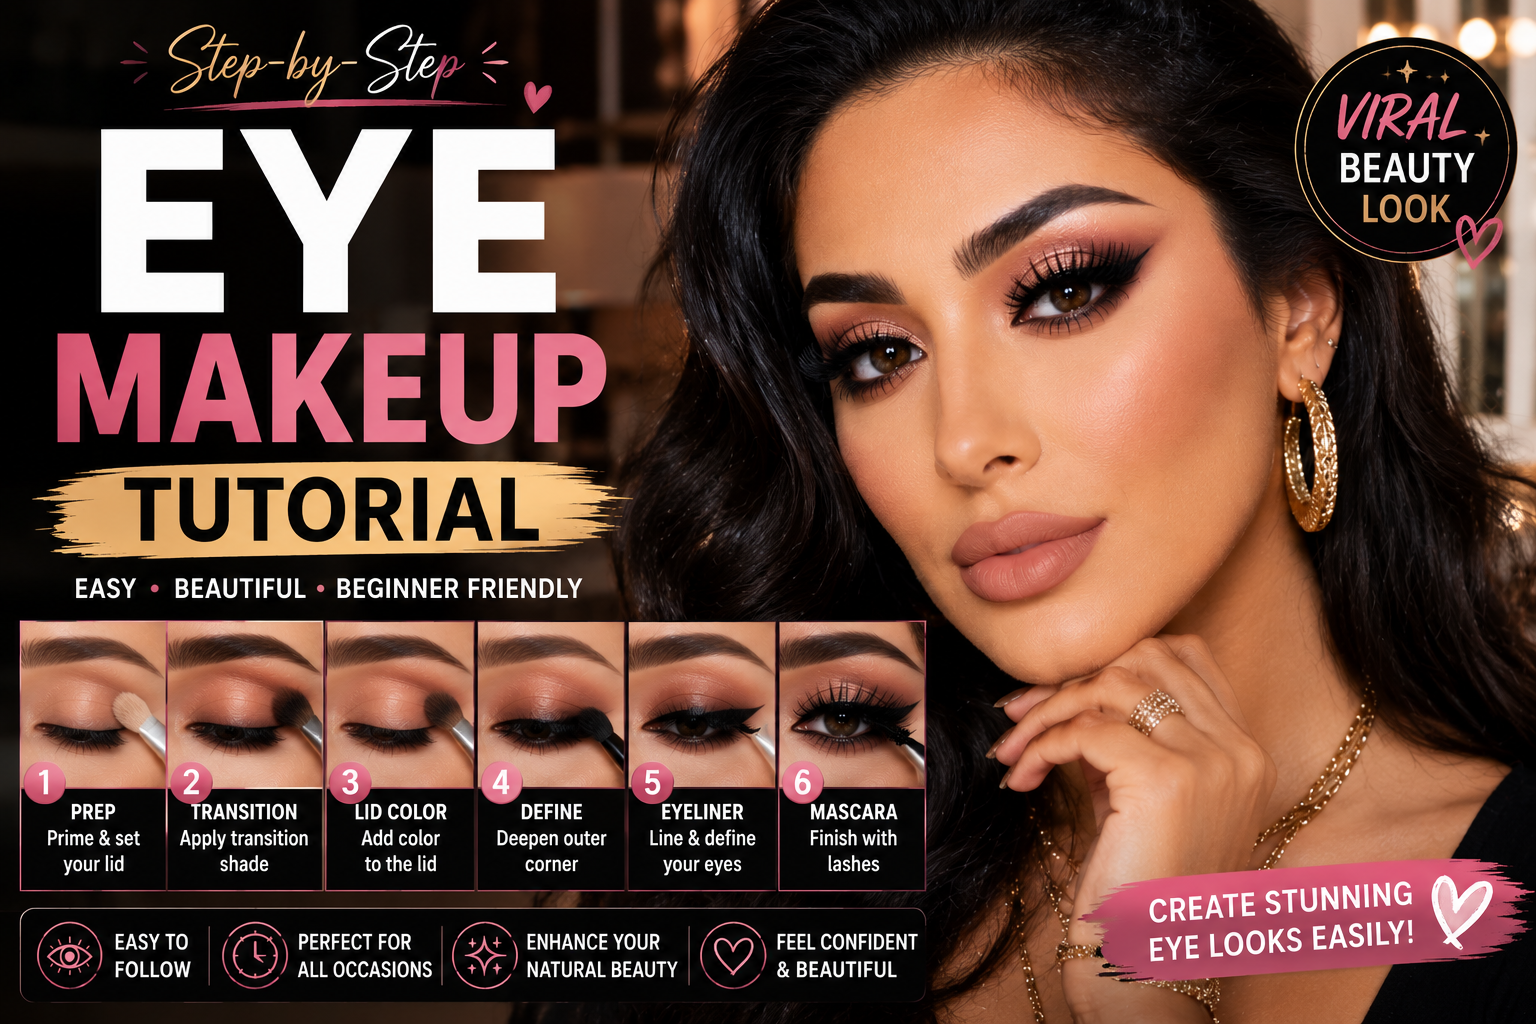
Eye Makeup Tutorial: Easy Steps for an Eye-Catching Look
Looking for an easy eye makeup tutorial? You’re in the right place. This beginner-friendly guide will show you how to create beautiful eye makeup step by step, from choosing the right eyeshadow and blending colors to applying eyeliner and mascara. Whether you’re getting ready for everyday wear or a special occasion, these simple techniques will help you create a polished eye look with confidence.
Eye makeup can completely change the way your overall makeup look comes together. A little eyeshadow, a soft line of eyeliner, and well-applied mascara can make your eyes look more defined without making your routine feel complicated. If you are new to makeup, though, looking at a full eyeshadow palette and several different brushes can feel overwhelming. Which shade goes first? Where should the darker color go? How much eyeliner is too much? And how do you keep mascara from smudging?
The good news is that you don’t need professional-level skills or a huge collection of products to create beautiful eye makeup. This eye makeup tutorial breaks the process down into simple steps that beginners can actually follow. You’ll learn how to prepare your eyelids, choose easy eyeshadow shades, blend them properly, apply eyeliner and mascara, and adjust the technique for different eye shapes. Whether you’re getting ready for work, a casual day out, dinner, or a special occasion, these techniques can become the foundation of your everyday makeup routine. This eye makeup tutorial is designed to make your routine simple, practical, and easy to follow.

What You Need for an Easy Eye Makeup Tutorial
Before you start, gather a few basic products. You don’t need every makeup tool available. For a simple eye makeup look, you’ll want:
- Eye primer or a small amount of concealer
- A neutral eyeshadow palette
- Fluffy blending brush
- Flat eyeshadow brush
- Small detail brush
- Eyeliner pencil or liquid eyeliner
- Mascara
- Eyelash curler, if you like using one
- Cotton swabs for quick cleanup
A neutral palette with shades such as cream, beige, taupe, warm brown, chocolate, and soft shimmer is especially useful for beginners because the colors are easy to combine. As you continue with this eye makeup tutorial, remember that small changes in placement can make a big difference .You can always experiment with brighter shades later.
Step 1: Prep Your Eyes for Makeup
Good eye makeup starts with a clean base. Remove any leftover makeup or excess oil from your eyelids before applying products. If your eyelids are oily, your eyeshadow may move or crease more quickly during the day. Apply a thin layer of eye primer if you have one. If you don’t, a small amount of concealer can help create an even-looking base. Don’t apply a thick layer. Too much product can actually make eyeshadow harder to blend. Give your base a moment to settle before moving on.
Step 2: Choose Eyeshadow for Your Eye Makeup Look
You don’t need five or six colors to create a pretty eye look. For your first attempt, choose three shades:
Light shade: Used to brighten the inner corner or brow bone.
Medium shade: Used as your transition color.
Dark shade: Used to add depth to the outer corner and lash line.
For a classic everyday look, try a combination of beige, soft brown, and deeper chocolate brown. Want something slightly more modern? Current 2026 eye-makeup trends are giving neutral looks more personality through colored liner, blue shades, softer shimmer, and intentionally smudged definition.

Pick up your medium eyeshadow with a fluffy blending brush. Tap off the excess product before putting the brush near your eye. This helps prevent too much pigment from landing in one area. Start in the crease and use small windshield-wiper motions to blend the color back and forth. You can also use small circular motions around the outer crease. The goal isn’t to create a harsh line. You want the color to look soft and diffused. Take your time here. Good blending usually makes a bigger difference than using expensive eyeshadow.
Step 4: Add Color to the Eyelid
Now use a flat eyeshadow brush to apply your main lid color. Press the shadow onto the eyelid instead of aggressively sweeping it back and forth. Pressing the product can give you better color payoff and reduce fallout. Start near the center of the lid and work toward the inner and outer areas. If you want a natural daytime look, use a matte or satin shade. For a night-out look, you can add a little shimmer to the center of the lid. A current approach to eye makeup is often less about complicated layers and more about soft, wearable definition. Cream and stick formulas can also be beginner-friendly because they are easy to blend with your fingertip.
Step 5: Add Definition to Your Eye Makeup
Take your darker shade with a smaller blending brush. Apply a small amount to the outer corner of your eyelid. Blend it inward toward the crease, but don’t bring too much dark shadow toward the inner corner. Keeping the deepest color toward the outside can create a more lifted appearance. Start with a tiny amount. You can always add more, but removing too much dark eyeshadow can become frustrating.
Step 6: Blend Everything Together
This is one of the most important steps in any eye makeup tutorial. Take a clean fluffy brush and gently blend the areas where your eyeshadow colors meet. Don’t keep adding color while blending. Your goal is to soften harsh edges rather than move all the pigment around .If your eyeshadow looks muddy, stop and use a clean brush. A common beginner mistake is blending too aggressively. Instead, use light pressure and short, controlled movements.
Step 7: Brighten the Inner Corner
Use your lightest shade on the inner corner of your eye. A soft cream, champagne, or light beige can work beautifully for an everyday look. You don’t need a very bright white highlight unless you specifically want a dramatic effect. For a more natural finish, choose a shade that is only slightly lighter than your skin tone.
Use a small amount of your lightest matte or satin shade underneath the brow. Keep this step subtle. Too much bright product under the brow can make the makeup look dated or overly dramatic. A soft highlight simply helps create a clean transition between your eyeshadow and eyebrows.
Step 9: Apply Eyeliner
Eyeliner doesn’t have to be perfect. If you’re a beginner, start with a brown or dark charcoal pencil instead of immediately trying to create a sharp liquid wing. Place the liner as close to your upper lash line as possible. Use short strokes rather than attempting one long line. If you want a softer appearance, gently smudge the pencil with a small brush. For a more dramatic look, extend the outer corner slightly upward .And don’t worry if both sides aren’t identical. Human eyes aren’t perfectly symmetrical, so your eyeliner doesn’t have to be either.

If you use an eyelash curler, curl your lashes before applying mascara.Position the curler close to the lash roots without pinching the skin.Give it a gentle squeeze, then release.You don’t need to clamp aggressively.If you’re uncomfortable using an eyelash curler, simply skip this step. Mascara alone can still give your lashes definition.
Step 11: Apply Mascara
Mascara is the finishing touch that can make the entire eye makeup look feel more polished.Place the mascara wand near the roots of your upper lashes and gently wiggle it toward the tips.One coat is usually enough for a natural look.For more volume, allow the first coat to become slightly tacky before applying a second.Avoid repeatedly adding layer after layer because too much mascara can create heavy, clumpy lashes.For lower lashes, use a small amount and keep the application controlled.
One technique doesn’t necessarily look the same on everyone.Understanding your natural eye shape can help you decide where to place eyeshadow and eyeliner.
Eye Makeup for Hooded Eyes
With hooded eyes, part of the eyelid may be covered when your eyes are open.Apply your transition shade slightly above the natural crease so the color remains visible when your eyes are open.Keep the darkest shadow toward the outer corner.For eyeliner, a thin line can often be easier to wear than a very thick one.
Eye Makeup for Round Eyes
If you want to create a more elongated appearance, concentrate darker shadow toward the outer third of the eyelid.You can extend your eyeliner slightly outward.Keep the center of the lid a little brighter to maintain dimension.
Eye Makeup for Almond Eyes
Almond eyes work well with many different techniques.A classic three-shadow look can be especially easy: transition shade in the crease, medium color on the lid, and deeper color toward the outer corner.You can also experiment with winged liner.
Eye Makeup for Downturned Eyes
If the outer corners naturally angle downward, concentrate the darkest shadow slightly above and outward from the corner.When applying eyeliner, avoid pulling the wing too far downward.A small lifted flick can help create a more upward-looking finish.
Eye Makeup for Deep-Set Eyes
For deep-set eyes, avoid putting too much dark shadow deep into the crease.Instead, keep the lid relatively bright and use medium shades around the surrounding eye area.The goal is to maintain dimension without making the eyes appear more recessed.
Eye Makeup for Different Eye Colors
Your eye color can also influence which eyeshadow shades you may enjoy.
Brown Eyes
Brown eyes are incredibly versatile. Try bronze, copper, chocolate, plum, olive, champagne, or warm peach shades.
Blue Eyes
Warm tones can create a beautiful contrast with blue eyes.Try bronze, copper, caramel, peach, terracotta, and warm brown.You can also experiment with navy or soft blue for a tonal look.
Green Eyes
Plum, mauve, burgundy, bronze, and warm brown can beautifully complement green eyes.You don’t need to stick to purple, though. Neutral shades can look just as elegant.
Hazel Eyes
Hazel eyes can shift between green, brown, and gold depending on lighting.Bronze, olive, warm brown, plum, and champagne shades can bring out different tones.

How to Make Eye Makeup Last Longer
If your eye makeup disappears by lunchtime, a few small changes can help.
Start With the Right Base
Excess oil can cause eyeshadow to crease or fade.Use a suitable eye primer and avoid applying too much skincare directly onto the eyelid immediately before makeup.
Use Thin Layers
Heavy layers aren’t always better.Apply eyeshadow gradually until you reach your desired intensity.
Blend, Then Set
If you’re using cream products, set them lightly with a compatible powder shadow if needed.
Avoid Touching Your Eyes
Rubbing your eyes is one of the easiest ways to ruin eyeliner, eyeshadow, and mascara.
Choose Waterproof Products When Needed
If you’re going somewhere hot, humid, or emotional—like a wedding—water-resistant or waterproof eye products can be useful.
Common Eye Makeup Mistakes to Avoid
Using Too Much Eyeshadow
It’s easier to add more than to remove excess product.Start with a small amount.
Skipping Blending
Harsh edges can make even beautiful colors look unfinished.Spend extra time softening transitions.
Applying Too Much Concealer
A thick layer around the eyes can make the area look heavy.Use a small amount and blend carefully.
Drawing a Very Thick Eyeliner Line
Thick liner can overpower the eyes, especially for everyday makeup.Start thin and build gradually.
Applying Too Much Mascara
Multiple heavy coats can cause clumping.Focus on controlled application.
Using Only One Eyeshadow Shade
One-color eye makeup can absolutely look beautiful, but beginners often get better dimension by combining at least a transition shade with a lid shade.
Forgetting to Clean Fallout
Dark eyeshadow can fall beneath your eyes.If this happens, don’t panic.Use a clean brush or cotton swab to remove the fallout before finishing your complexion makeup.
How to Create a Quick 5-Minute Eye Makeup Look
Don’t have time for a full routine?
Try this:
1: Start by applying a neutral cream or powder shadow across the lid.
2: Next, add a medium brown shade to the outer corner and crease.
3: Apply a soft brown pencil along the upper lash line.
4: Curl your lashes and apply mascara.
5: Finally, brighten the inner corner with a small amount of light eyeshadow
That’s it. You can create a polished everyday look without using a dozen products.
How to Turn Your Daytime Eye Makeup Into a Night Look
You don’t need to remove everything and start over.
Instead:
- Add a deeper brown or charcoal shadow to the outer corner.
- Blend it toward the crease.
- Add a touch of shimmer to the center of the lid.
- Intensify your eyeliner.
- Apply another light coat of mascara.
For a more modern 2026 look, you can replace traditional black liner with a soft colored liner or add a subtle blue, burgundy, or pearlescent accent. Current trend coverage shows that expressive eye color and softer, diffused finishes are having a strong moment.

Keep these simple rules in mind:
- Start with neutral shades.
- Use less product than you think you need.
- Build color slowly.
- Blend with light pressure.
- Keep your brushes clean.
- Use a thin layer of primer.
- Apply eyeliner in short strokes.
- Don’t rush mascara application.
- Check your makeup with your eyes open.
- Practice before an important event.
- Don’t compare your first attempt with a professional makeup artist’s work.
Most importantly, remember that makeup is supposed to be fun.
You don’t need to recreate every viral look you see online. Find techniques that work with your features, your lifestyle, and the amount of time you actually want to spend getting ready.With the techniques in this eye makeup tutorial, you can create everything from a simple daytime look to a more dramatic evening style.
Final Thoughts
Final Thoughts
A beautiful eye makeup look doesn’t have to be complicated.
Once you understand the basics—prep, transition shade, lid color, outer-corner definition, blending, eyeliner, and mascara—you can create dozens of different looks using the same few products. Start with a simple neutral combination and practice your blending. Once you’re comfortable, experiment with different colors, eyeliner shapes, shimmer, and techniques for your specific eye shape. Don’t be afraid to make mistakes. Some of the best makeup skills come from experimenting and discovering what works for you. Whether you’re getting ready for a regular day or creating a dramatic evening look, this eye makeup tutorial gives you a simple foundation to build on. With a little practice, you’ll be able to adjust the intensity, colors, and technique to create an eye look that feels completely your own.
Pro tip: Take a photo of your makeup in natural light after you finish. It can help you see where your blending or placement could improve the next time.




One Comment